- Published on
Local Cloud: Setting up Alpine Linux
- Authors

- Name
- David Kocen
This is part of an ongoing series. Read the introductory post here!
This post will cover the first step of acquiring and building hardware. Posts on the other setup steps can be found below:

The hardware is acquired, everything is plugged in and turns on, lets actually make it useful. In this post I'll be discussing the decision for which OS to use (spoiler: Alpine Linux) and setting it up.
Thank you TomCore! My instructions are a modification of theirs.
OS Considerations
I spent a fair bit researching what the best base OS would be to use for our servers. I had some experience using Ubuntu server so that was the default. While it probably would have worked alright I wanted to be careful given our limited resources (especially with RAM) and also this is all to learn anyways so lets do something new.
Decision criteria:
- Lightweight. We do not have a lot of compute resources so the smaller and less compute intensive the better.
- Secure. I still plan on playing around with security stuff using this project so having something secure by default will give me a good base to work from.
- Active community. Truthfully I am not a Linux expert so I needed an online community for support.
In the end I went with Alpine Linux. It met all three criteria above but also had an existing Raspberry Pi ready image. Additionally, Alpine Linux is a very common base image for containers so more experience with it will come in handy when I am working with containers for my job.
Runner ups:
- Tiny Core Linux. This OS is even smaller than Alpine. However, it felt a little too barebones for my taste. It is a really cool project but my focus ultimately is to learn more about infrastructure automation not Linux systems so I could use a little more built-in tooling. Also Alpine Linux has a stronger online community.
- Fedora CoreOS. I am hoping the majority of my solution is containerized so having an operating system specifically designed to run containers seemed like a good idea. It is also part of the Fedora Project which I have never used but I know is popular. I worried a bit about locking myself into having containers for everything though so decided against it.
- Linux From Scratch. I had about a day of thinking maybe I should just build my own. It would be all mine, I'm sure I would learn a ton, and it would be as minimal as I could get away with. However, I had to remember my focus is on infrastructure automation not Linux. One of these days I hope to come back to this though. Seems like a fun weekend.
Alpine Linux Setup
Now that the OS is decided lets get things running. Below I will go through all the steps to get Alpine Linux running on a Raspberry Pi 3A+ (though I imagine it is similar across models).
This setup requires a host computer with an SD card slot. I use Ubuntu so the instructions are Linux specific but similar steps can be done on Windows or MacOS. You will just have to find the equivalent tools.
Terminology:
- Host computer: This is just my laptop
- Server: This is the Raspberry Pi
Partition microSD card and download OS
First we need to partition our microSD card into three partitions:
- Boot: This partition is where the OS will live and what gets triggered when the server is powered on.
- Swap: This partition is reserved to serve as swap memory. In simple terms swap memory is kind of like reserving some storage to act like additional RAM in case of overflow. We do not have a lot of RAM to work with so this will hopefully help.
- System: This is the partition for everything else. Here is where we will install and run software, store any local files, etc.
I am using a 32GB microSD card so the partition sizes are done with that in mind. You can adjust as you see fit.
-
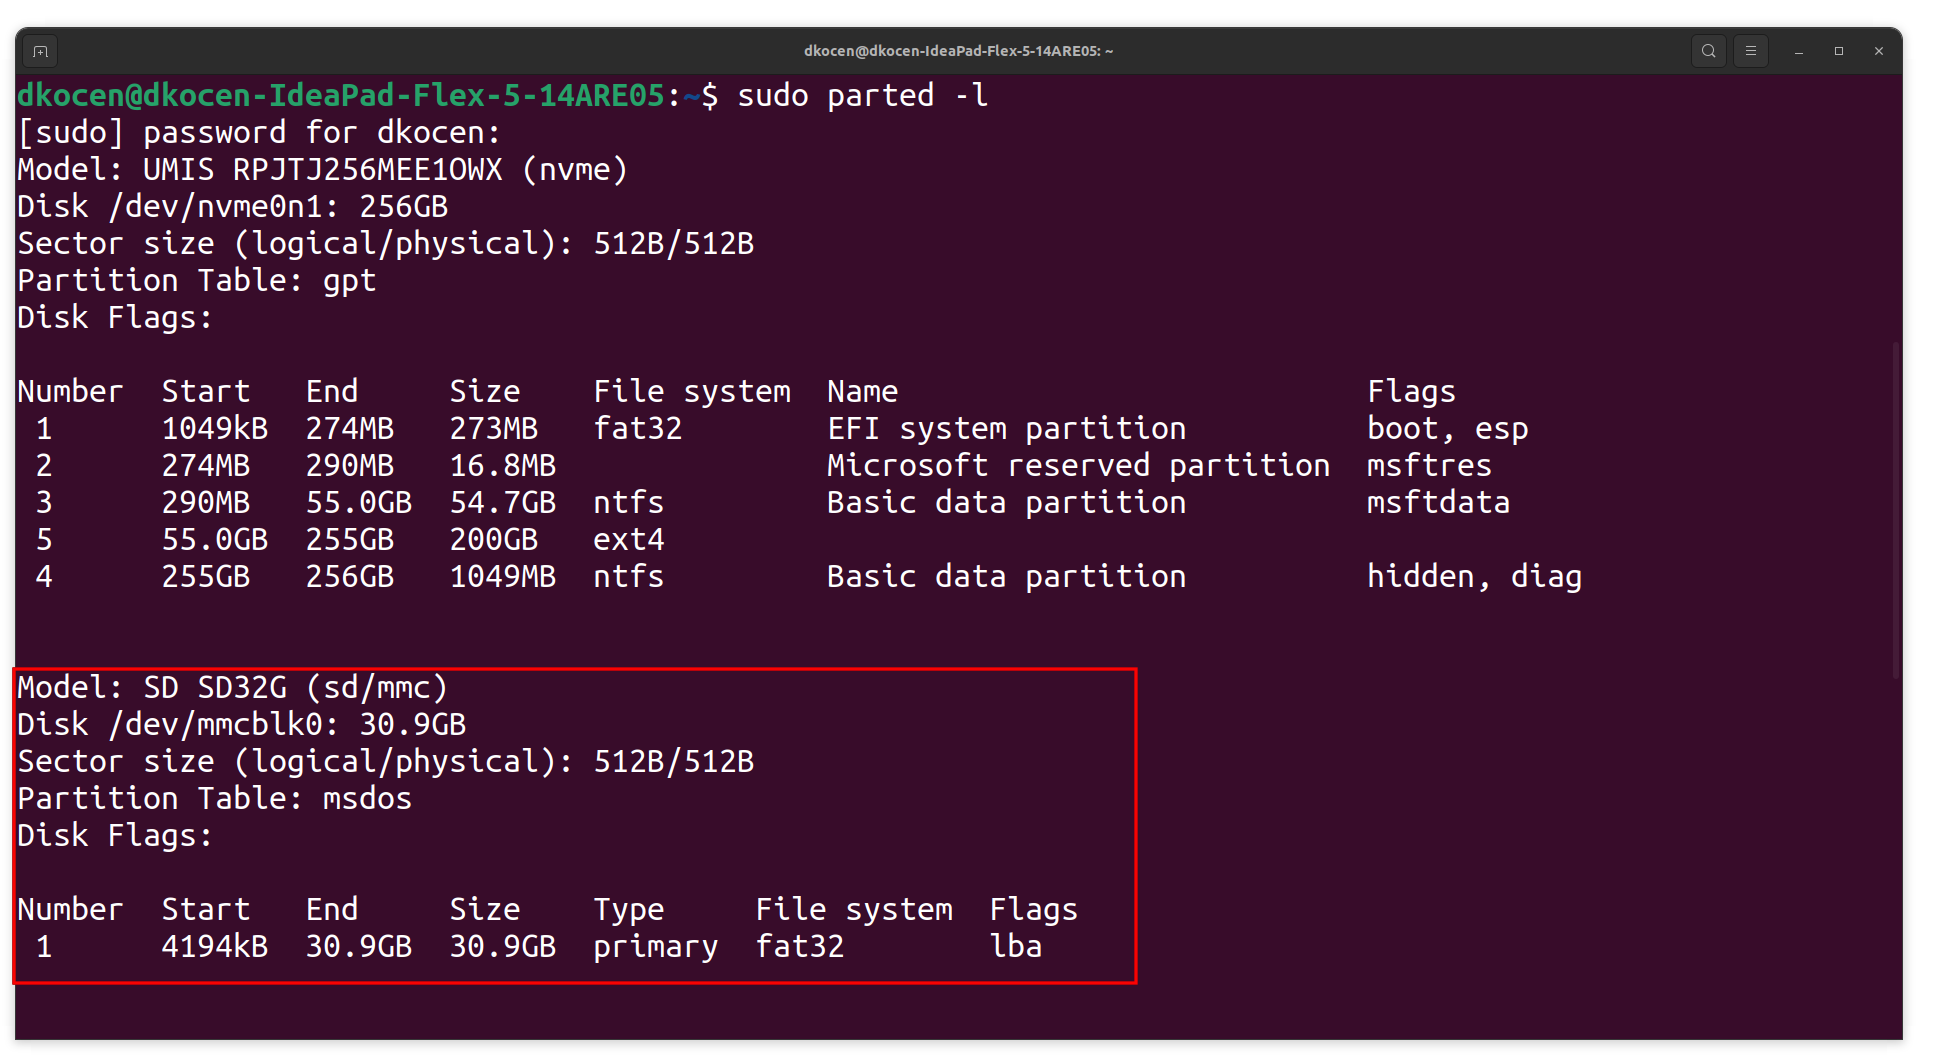
Insert the SD card and list out the available partitions. This is done using Parted which you may need to install beforehand. Note the disk name you will be working with. Mine is /dev/mmcblk0.
sudo parted -l -
Open the disk in Parted and delete any current partitions so we have a clean slate. My disk had one partition on it that I removed.
sudo parted /dev/mmcblk0 rm 1 -
Still in Parted, create the boot, swap, ad system partitions. Our boot partition is 256MB and will be FAT32. The swap partition is 4GB. Our system partition will just be the rest of the space (hence 100%) and EXT4. You can close Parted afterwards
mkpart primary fat32 1MB 256MB mkpart primary linux-swap 256MB 4256MB mkpart primary ext4 4256 100% quit -
Next format the partitions to use the filesystem we want. By default we can find the partitions in the
/devfolder in Ubuntu. Each partition should be something like[Disk Name]p1or[Disk Name]p2. For me the partitions map as so:/dev/mmcblk0p1: boot partition formatted as FAT32/dev/mmcblk0p2: swap partition formatted as swap memory (note themkswapcommand rather thanmkfs)/dev/mmcblk0p3: system partition formatted as EXT4
sudo mkfs -t fat /dev/mmcblk0p1 sudo mkswap /dev/mmcblk0p2 sudo mkfs -t ext4 /dev/mmcblk0p3 -
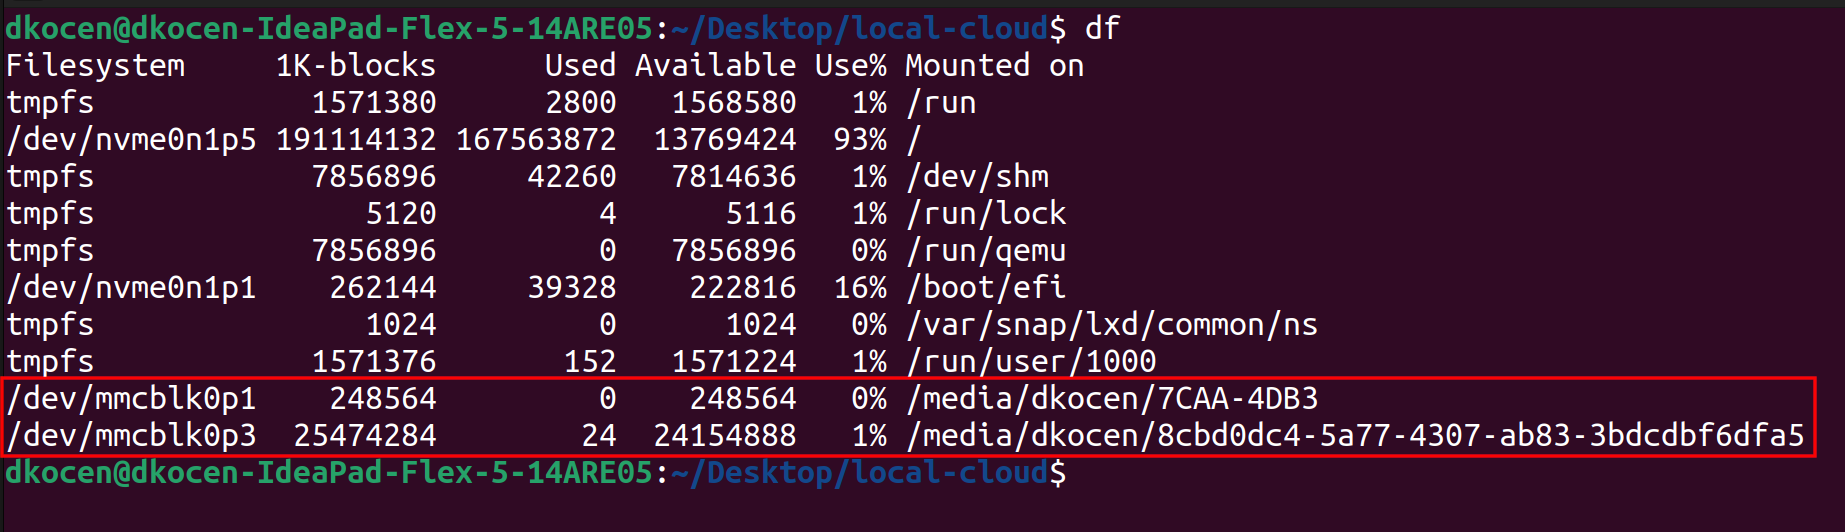
Once formatted remove and reinsert the microSD card. If you run the
dfcommand you should see your boot and system partitions mounted under the/mediafolder. -
Download and unpack Alpine Linux for Raspberry Pi aarch64 onto your boot partition (for me this is
/media/dkocen/7CAA-4DB3).wget https://dl-cdn.alpinelinux.org/alpine/v3.18/releases/aarch64/alpine-rpi-3.18.3-aarch64.tar.gz tar -xvzf alpine-rpi-3.18.3-aarch64.tar.gz -C /PATH/TO/BOOT/PARTITION -
Eject the disk when it finishes copying.
Boot and Configure Alpine
Now that Alpine Linux is on our microSD card we can boot up our Raspberry Pi and start configuring things.

-
Put the microSD into the server and power it on. Make sure you have a monitor and keyboard connected as well.
-
Log in using
root. There is no password so just press enter. -
Run
setup-alpine -
Set your keyboard layout.
-
Give the server a unique hostname. This will be useful later when we are trying to setup SSH. I went with
davidcloud0,davidcloud1, etc -
The setup script should automatically detect a wifi network called something like
wlan0. Choose to initalize it and log into your wifi network. -
Select
dhcpfor the IP address andnfor other configurations.- Note that using DHCP will dynamically assign an IP address to your server each time it is booted. You could assign a static IP address but I thought this would force me to learn a little more about DNS when I get to connecting remotely. The plan is to always be able to connect via the devices name rather than a specific IP address.
-
Set password and timezone
-
Do not set up an HTTP proxy and stick with Chrony for the NTP client (this should be the default).
-
Select which mirror you want to use for downloading packages. I just let it detect the fastest using by typing
fbut this does take a moment -
Create a user. It is bad practice to always use
rootso this will be our main admin user. -
Don't set an SSH key for now but use OpenSSH.
-
Don't try to boot media and just stick with the defaults for everything else (config store, apk cache, etc).
Install Alpine to boot partition and enable swap
Great! Once the script finishes we have successfully configured our Alpine Linux setup. Now we just need to install the configured version to our boot partition so that all this is not lost when we restart the server.
Note that it is possible to run Alpine Linux entirely within RAM (super speedy) but we have limited RAM so will be taking the more traditional route of running it from the microSD card. See the Alpine Linux installation wiki for more information about the different ways we can install Alpine Linux.
-
Mount the system partition as
/mntand enable swap upon bootingmount /dev/mmcblk0p3 /mnt swapon /dev/mmcblk0p2 rc-update add swap boot -
Run the
setup-diskscript to install Alpine Linux into our system partition. We want to do it in the system partition first so that there is enough space for temporary installation files. Afterwards we will move the final setup to our boot partition.export FORCE_BOOTFS=1 # This lets us use a non-FAT32 partition export SWAP_DEVICES=/dev/mmcblk0p2 # Our swap partition setup-disk /mnt -
Remount the boot partition making it read and writeable, remove any existing files, and copy over our new boot files containing the fully configured Alpine Linux installation.
mount -o remount,rw /dev/mmcblk0p1 rm /media/mmcblk0p1/* -r cp -r /mnt/boot/* /media/mmcblk0p1/ -
Reboot and hope for the best! It should autoconnect to your wifi and have all the settings we configured earlier.
Conclusion
That's it. After the reboot you should have a fully operational Raspberry Pi with Alpine Linux running. Next up is enabling remote connection via SSH so we can just do all future actions from a laptop.